How to Backup your Iphone

By default your iPhone will automatically sync and create a backup each time your iPhone is connected to

How to Remove Facebook Timeline

So now you have reached here searching for how to remove this timeline feature . I’m not surprised because many of

How to improve Your mobile phone Signal

Wait, I can't hear you" is more than a smarmy catchphrase. It's also the enraged anthem of anyone

How to chat with your friends using command prompt

If you want to chat with your friends, you just have to know one thing, which is your friend's system's

How to Access Blocked Social Websites

The scenario has changed a lot over the past decade.Internet has grown into a vast resource and with

Monday, 24 September 2012

How to Remove Blogger Navbar


Navigation bar in blogger is default and it is there for the users through which they can easily navigate to other blogs.But many of blogger not like navigation bar and want to remove it but since it is default so we can not remove it but no need to worry ,we can hide it...hiding of nav bar is so simple,just go through the below post :-


Step.1.Sign in to your blogger account and click the layout button next to your blog name


Step.2.Next,click the edit html tab as shown in the below picture.


Step.3.Add the below html code as specified in the below picture.
#navbar {
      height: 0px;
      visibility: hidden;
      display: none;
}


Step.4. Save the changes.

If you want the navigation bar again then simply remove that code and save changes.


Saturday, 22 September 2012

How to Hack a Pc with USB


Hello readers ,well we all know that nowdays hacking is become most popular and many of us are trying to learn the new and new tricks of hacking, so guys today i will show you an unique trick through which you can hack anybodys computers very easily and steal the passwords and other important data from his computer without let him knowing that you are hacking his computer....so friends just go through the post.....


Follow the steps :-

1.Download this rar file here.
2.Now Extract it.
3.Open pc info in it.
4.Select all the files and paste it in your USB (pendrive)
5.Insert the USB in the victims pc..
6.Open the USB drive, give it 2 to 5 sec and and your job is done...
7.And now plug the USB in your Computer and open the dump folder and you will see that you have all the info you want like passwords,emails,ids etc...


Note :- This trick is for education purpose only,Howcrunch is not responsible for any damage.


How to Make a Bootable USB Pen Drive


Why to carry a disk when you can install your windows with your USB ,its so simple.Installation of windows with bootable USB also have some advantages it increase the overall speed of the installation process significantly,and carrying a USB pen drive is more convenient than to carry a disk, and one most significant advantage is that now its possible to install the windows even on those systems that do not have a DVD/Disk drive, such as a netbook.


Below post will guide you that how to load a Windows on your USB Pen drive and make it bootable just like the disk ;-

1. First you need a USB flash drive with a minimum space of 4 GB.
2. Windows 7 Setup DVD disk.
3. Plug-in your USB flash/pen drive.
4.Open the PowerShell (OR Command Prompt if PowerShell Not Exist). If you are using Windows 7/Vista then open it with administrator rights*.
* Goto Start -> All Programs -> Accessories ->Windows PowerShell ->  Right-click on “Windows PowerShell” and select “Run as Administrator”.
 5.In the PowerShell, type

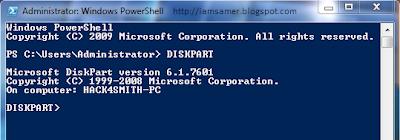
DISKPART

This will start the Microsoft DiskPart utility as shown below:

Now issue the following command:
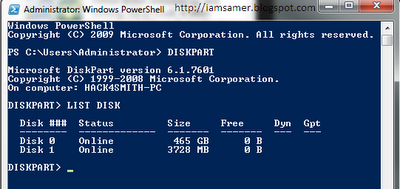
LIST DISK

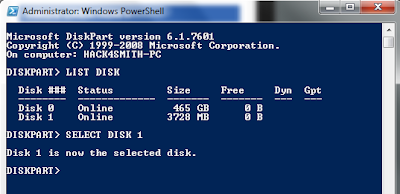
This will show you a list of  available disks on your system. Disk 0 is usually the hard disk. In my case, Disk 1 is the USB drive (this can be a different one in your case). Now issue the command as shown below:


SELECT DISK 1


above command, 1 is the USB drive number on my system. If you have a different number on your system, then you need to replace 1 with that number.

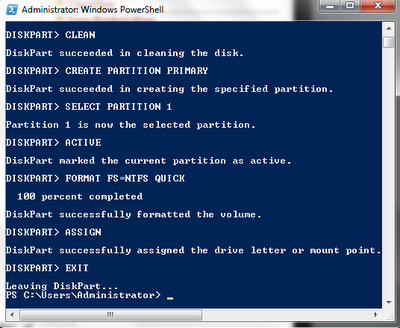
6.Now issue the following list of commands one by one as shown below:

CLEAN
CREATE PARTITION PRIMARY
SELECT PARTITION 1
ACTIVE
FORMAT FS=NTFS QUICK
ASSIGN
EXIT


Close Power Shell and proceed to the next step.

7.Insert the Windows 7/Vista installation disc and note down the “drive letter” of your DVD drive. In my case, it is “H:”.


Open the command prompt. If you are using Windows 7/Vista then open it with administrator rights*.
* Goto Start -> All Programs -> Accessories -> Right-click on “Command Prompt” and select “Run as Administrator”.

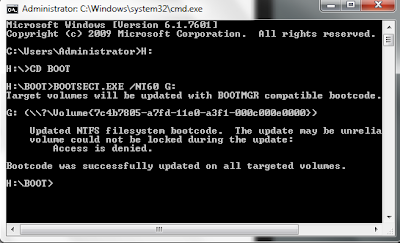
Now type the following list of commands as shown below:
H:
CD BOOT
BOOTSECT.EXE /NT60 G:(NOTE:
G: is your USB drive letter)

EXIT


8.Copy the contents of your Windows 7/Vista installation disk into the USB flash drive.
Directly Copy-Paste All DVD file into Usb Stick Then…

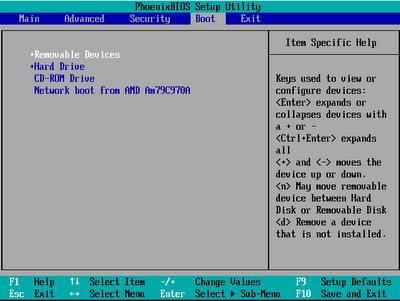
Your USB stick is now ready to boot and install the OS for you. Don’t forget to enable the “USB Boot” option and change the “Boot priority to USB device from hard disk” in your BIOS settings.


How to Make a Telescope with cardboard


Before showing you the process to make a telescope ... first let you guys know that what is telescope?
A Telescope is an instrument which makes a far away object to look closer.Below article will show you the steps for makeing a telescope with pictures....
Make your own telescope
This is the complete look of your telescope after you complete.


Follow the Steps :-

1.) Collect the Material required :-
parts and tools used to make this telescope
a.Two cardboard tubes around 12" each; one should slide into the other(Get two cardboard tubes with one that can slide in and out of the other.)
b.Two lenses of differing focal length(For your primary lens a convex lens at least 50 millimeters in diameter and a focal length of between 200 and 300 millimeters. For the secondary lens you get a convex lens that is between 10 and 25 millimeters wide with a focal length of less than 75 millimeters)
c.Two small pieces of corrugated cardboard.
d.Scissors, pencil, razor knife, paint and glue.

2.)
Trace the lens line
Put a lens down on the square of corrugated cardboard and draw a line around it. Do this whole process for both lenses. (make two of these)


3.)
Cut teh lens hole out
Using an razor knife cut the circle out. You can use scissors but it is rather difficult because you will tend to bend and distort the cardboard. Try to cut the circle so the hole is just a tiny bit smaller than the lens. Maybe about 1/32 of an inch
.


 4.)
pop the lens in
Pop your lens right into the cardboard. Because of the thickness of the cardboard you should be able to squeeze the lens right in there and it will hold tight. If you have trouble or it doesn't hold tight then just use a little bit of glue and let it dry
.


5.)
Trim the cardboard ring
Now, with a pair of scissors trim the cardboard ring so it is the same diameter as the tube. Remember that you have two tubes and each one is a different size because one slides into the other. Trim the ring with the long focus lens so it is the same size as your thicker outer tube. And trim the ring with the short focus lens so it is the same size as your thinner inner tube.


6.) Glue rings onto tubes
Now glue each ring onto its respective tube.


 7.)
Your telescope is complete
Slide the thinner tube into the thicker tube and your telescope is complete. Enjoy!!!!


Saturday, 15 September 2012

How to use Google earth on Iphone


You should follow these steps given below:-
1) First of all, you need to install Google Earth app. Open App Store on your iPhone or iPod Touch, search and installed Google Earth. It's free.
2) Lanuch Google Earth(required internet connected).
3) Use your finger to flow the Earth and double click to zoom in.
4) There are many third-part information built-in in the Google Earth, click the "i" symbol on the bottom right to enable or enable them.
5) You can quickly switch where you are by one click on the symbol on the bottom left.
You need to allow Google Earth to use your current location.
Then Google Earth will find out where you are. It's done.

Friday, 14 September 2012

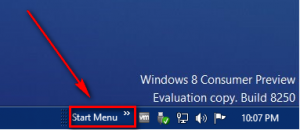
How to add a (simple) start menu to Windows 8

 Windows 8 comes with new features and look but it is with lack of a Start Menu -- you know the cornerstone of Windows since... forever. Because of this new change, many programs have cropped up to fill the void, allowing you to add a start menu to Windows 8. What if you don't want to use third-party programs? Can you still have a start menu in Windows 8? Oh why yes you can good sir (or madam).

Just go through the post :-

To add a start menu to Windows 8, do the following:

1.) Make sure your taskbar is not locked. To check if your taskbar is locked, right-click on a blank spot of the taskbar and see if Lock the taskbar is checked. If it is checked, click on it to uncheck it. If it is not checked, you don't have to do anything.
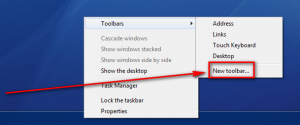
Step 1: Right-click on a blank spot of the taskbar and select Toolbars -> New tool bar…:

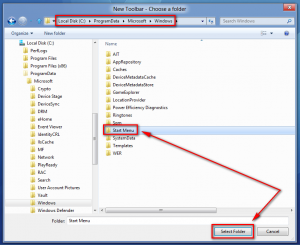
2) Browse to Local Disk (C:/ drive) -> ProgramData -> Microsoft -> Windows, single left-click on the Start Menu folder, and hit Select Folder:
Congrats! You now have a "start menu" on your Windows taskbar:
done!!

How to format windows XP

Hello readers below are the steps which will guide you to format your windows Xp ..... read the steps one by one carefully and format your Xp .... formatting process will take some time so do it carefully....

  1. First you must put your Windows XP CD in the drive.
  2. Then restart your computer.
  3. When it says press any key to boot from cd, Press any key on the keyboard. I use the space bar, easy to get to. (If you can do this Go to step 6)
  4. If it doesn’t ask you to  press any key to boot from cd then restart your computer again.
  5. Go into the BIOS settings of your PC, usually by pressing the F1, F2, F10, or maybe the delete key. If you are not sure watch the screen at startup and it will say “To enter setup press…….”. You have to be quick and press it. If you miss it restart again. Once you are in the bios you have to change the boot options. You have to make your cd rom the first boot option. Save and exit. If you do not understand how to get into your BIOS please see how to get into your BIOS and change settings.
  6. When the CD starts up A blue screen will appear and you are on your way..
how to format windows xp
  1. Press Enter to setup Windows XP now. See screen shot above. Do not rush through this process as pressing the wrong key here can take you down the wrong road. You should take your time when its your first time learning how to format a computer using windows xp.
  2. If there is a copy of Windows XP on your computer and you wish to overwrite it you will have to press the escape button when prompted. (screen shot below) Do not install Windows XP in another directory unless you know what you are doing. Just overwrite the previous version as you should have backed up your files anyway. In this example I am showing you how to format a computer that has already had Windows installed on it.
format Windows
  1. You should now make the partition that had windows on it blue and press D to delete the partition. It will ask if you are sure. Press L to confirm. More details on deleting partitions.
  2. Then Press C to create another partition and Windows will estimate a size for you. If you wanted to partition your hard drive into two equal parts you would have to do some math’s and then type the appropriate number in. Otherwise just going with what Windows puts there will be the minimum partition size. If you make a mistake when estimating the size of a partition you can simply go back now and delete the partition and start again. Do not move forward if you have made a mistake.
  3. Press Enter to confirm size.
  4. Then it will ask you which partition you want to install Windows on. The default is C: drive. Select this by making it blue and press enter.
  5. If there are no partitions it will create one for you.
  6. Then it will ask you to format quick, normal, in fat32 or NTFS. Fat32 suits older computers so I choose a quick format with NTFS. Quick or Slow is fine. If you had errors it is better to use a slow format which can also be known as a low level format. When you format a computer please note that a low level format can take a long time, depending on what size hard drive you have.
  7. From now on you just Follow the prompts and let it go..the process of formatting your computer is on its way. Some setup files will be taken from the Windows CD onto your computer to complete this process.
  8. The computer will restart and it will try to boot from cd again…Do not press anything on the keyboard.. Just let it go through the stages of setup. You only press the ANY KEY at the start to get it to boot to the Windows XP cd.
  9. Make sure you have your serial number ready to enter in. This can be found on your coa sticker which is a sticker usually put on the side of your computer.
  10. Do not remove the Windows XP CD until the computer has started up with a new desktop and icons.
Now the next process begins.. Installing your device drivers for your computer.

How to Add the Facebook Like Box to Your WordPress WebSite

Below steps will show you that (with screen shots) how to add the Facebook Like Box to your WordPress website or blog:

  1. Head over to the developers like box page on Facebook.
  2. Type in your Facebook Page URL (has to be a business page and not a personal profile)
    How to add the Facebook like box to your WordPress website
  3. Select your options.
  4. Click the “Get Code” button.
  5. Select iFrame, copy and paste the code it outputs into a text file.
    How to add the Facebook like box to your WordPress website
  6. Log in to your WordPress site and add a new text widget (or use an existing one) to your sidebar, paste in the code and save it.
  7. Take a look at your site and adjust the width and height properties of the pasted code until it looks right!!!!!! done!!!!

How To Capture a Screen Shot of your Desktop

For takeing the screenshot of your dekstop just go through some simple steps:-

screenshot
 Steps:-
  1. Press the Print Screen key on your keyboard. It may be labeled [PrtScn].
  2. Open an image editing program, such as Microsoft Paint.
  3. Go to the Edit menu and choose Paste.
  4. If prompted to enlarge the image, choose Yes.
  5. Optional: Use your image editor's crop tool to crop out unnecessary portions of the screen shot.
  6. Go to the File Menu and choose Save As.
  7. Navigate to the folder where you want to save the image.
  8. Type a file name for the image.
  9. Select a file type.
  10. Click the Save button.

Monday, 10 September 2012

How to Make Google Chrome Faster

From past few days many readers are asking for increasing the browsing speed of google chrome
so here is the solution speed up your chrome browser and enjoy fast speed internet....

Below are few steps which you have to follow :-

1.Disable Plugins

By default, when you install Google Chrome, many unnecessary plugins are installed and enabled. Plugins help Chrome process special types of content, such as Flash, Java, Silverlight, or Windows Media files, but most of them aren’t even important to your daily browsing. Plugins can slow down the performance of Chrome, but you can disable plugins you are not using. To do this, type “about:plugins” (without the quotes) in the address bar of Chrome and press Enter.
NOTE: You can safely disable every single plugin, but you may want to keep Flash enabled, as a lot of sites use Flash to display menus, show videos, etc. Also, if you watch Netflix in Chrome, you need to keep the Silverlight plugin enabled. You can always enable a plugin again if you need to.

A list of installed plugins displays on the current tab. Scroll through the list and click the Disable link for each plugin you feel you don’t need.

NOTE: Plugins cannot be deleted or uninstalled, only disabled. An exception would be a plugin that was installed as part of an extension and you uninstall the extension. Then, the plugin is automatically removed.


Disabled plugins turn gray in the list, and the Disable link for each disabled plugin becomes an Enable link, allowing you to enable the plugin again, if desired.

2.Disable Extensions

Extensions are small programs available in the Chrome Web Store that add extra features and functionality to Chrome. They can be very useful, but if you end up with a lot of extensions installed, the browser’s speed may be negatively affected. You can easily disable extensions without uninstalling them to gain some speed. Some extensions install a button on Chrome’s address bar, and those can be quickly disabled by right-clicking on them and choosing Uninstall from the menu.

You can also install apps in Chrome, that are accessible on the New Tab page. These can also be disabled.

To access your list of installed extensions and apps, click the wrench icon on the toolbar and select Tools -> Extensions from the drop-down menu. You can uninstall extensions with buttons without accessing this list, but you might be surprised that some extensions are in the list that don’t have a button.

To disable an extension, click the Enabled check box to the right of the extension’s title in the list so there is no check mark in the box.

The Enabled check box becomes an Enable check box, allowing you to re-enable the extension at any time.
NOTE: You can also easily remove any extensions or apps you don’t want anymore by clicking the trash can icon to the right of the Enabled check box.

Notice that there are a lot less extensions on our toolbar now.

3.Clear Browsing Data

As you browse the web, Chrome’s history database collects URLs and cached texts for websites you’ve visited, your download history, cookies, and other website and plugin data. While the point of the history and cache database are to speed up your computer by caching things locally instead of having to download every time, sometimes the history database can become very large and may slow down Chrome.
NOTE: You shouldn’t clear your history regularly for speed purposes, as that defeats the purpose of a local cache. You can certainly clear it for privacy reasons though.
There are several ways to clear your browsing history, including clearing your entire history and clearing the history for specific sites.

Clear Your Entire Browsing History

To clear your entire browsing history, click the wrench icon on the toolbar and select Tools -> Clear browsing data from the drop-down menu.
NOTE: Clearing your entire browsing history prevents matches from displaying when you start typing URLs in the address bar.

In the Clear browsing data dialog, select the items you want to clear and select a time range from the drop-down list. Click Clear browsing data to clear the selected data.

When the Clear browsing data dialog closes, the Settings tab opens. To close it, click the red X button on the tab.

4.Clear Specific Items from Your Browsing History

If you want to delete the history for only specific webpages, click the wrench icon on the toolbar and select History from the drop-down menu.

Move your mouse over a webpage you want to remove from the history list and select the check box that displays. Once you have selected all the webpages you want to remove, click Remove selected items.

A confirmation dialog box displays. Click OK if you are sure you want to remove the webpages from the history list.

To close the History tab, click the red X button on the tab.

5.Clear Your Browsing History from the New Tab Page

The New Tab page displays thumbnails for the websites you visit most. You can clear your browsing history by removing these thumbnails from the New Tab page.
To remove a webpage from the New Tab page, move your mouse over the thumbnail for the site and click the X that displays in the upper, right corner of the thumbnail.
NOTE: You can reset the New Tab page to blank thumbnails by clearing your entire browsing history, as mentioned earlier.

You can also remove a thumbnail from the New Tab page, by dragging it to the Remove from Chrome trash can, which only displays once you start dragging a thumbnail.

Above , we recommended disabling extensions you don’t use to speed up Chrome. However, there is one extension that might be useful. The Click&Clean extension allows you to clear browsing data automatically when you close Chrome.

To install Click&Clean, click the link above and then click the Add to Chrome button on the webpage for the extension.

A confirmation dialog box displays to make sure you want to install the extension. It also tells you what the extension can access. Click Add to continue with the installation.

Once Click&Clean has been installed, a notification displays, pointing to the new button on the Chrome toolbar.

When you click the Click&Clean button, the Main menu displays. There are many tools available in this extension for maintaining Chrome and your computer. The gray buttons in the middle of the menu provide access to more tools.
To configure Click&Clean to clear browsing data when Chrome exits, click the Options button on the Main menu.

To select which types of browsing data to clear when you close Chrome, click the Clear Private Data when Browser Closes tab on the left. Click the plus sign to the left of Chrome in the list on the right. Check the items you want automatically cleared when you close Chrome.

enjoy fast browsing!!!!!!